Friday, May 4, 2012

Mother's Day "Boast Badge"


These are so simple and easy to make and you can totally customize them anyway you like!! The best part is that you can use scraps from anything and everything in your craft closet to make them (scraps of ribbon, paper, string, feathers, beads, and on and on...).
Gather a ton of supplies and get started!

For sure you'll need a strip of paper about 23' long and 2-ish' wide. And two circles about the size of the top of a can, and some hot glue (or other glue of preference).Scroll on to see how I made mine, but remember, these are totally customizable to fit your mother's style! You can do anything!
I'm making two, and the pictures are a combination of each.

First I made the paper ribbons with the "mother stats" by using text boxes on Word and playing around with different fonts and sizings. (Close up from final photos)

Fancy cut and acordion fold your strip of paper.

Then glue the ends together to make a circle. Set aside.

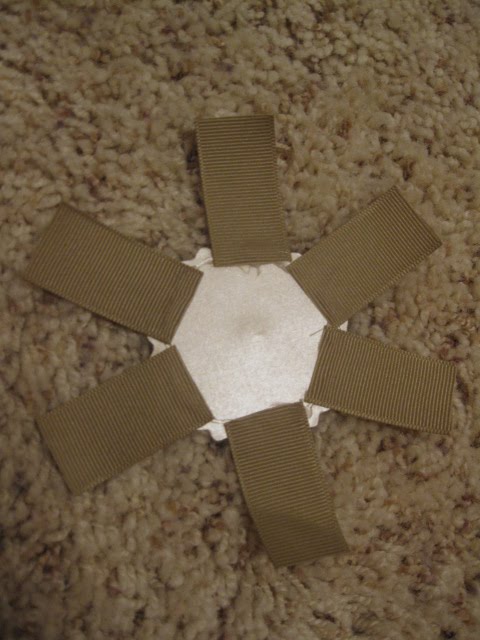
Arrange your ribbon and glue it onto the front of one circle, also glue a loop of string (for hanging up to display after use).

Then take your other circle and glue it on top of the other circle with the ribbon and string glued to it.

Then glue your accordion circle to the top of that.
Then I added some feathers (that I got off an old bouquet in the dumpster).

Then I took another circle cut the same size and glued my decorative ribbon to the back of it.


Then turn it over and add your embellishments to the front. I did a smaller circle of scrapbook paper and an old necklace pendant that had a picture of me, my mom, and sister :)

Then glue it on top of the accordion circle that's attached to the ribbon arrangement, and add any other embellishments you want.

And you're done! Quick, easy, and beautiful.

Sunday, April 1, 2012

Junk Magnet Make-Over

I'm the assistant manager at my apartment complex, and we have to put up an emergency magnet in each apt whenever someone new moves in. However, we have to cut out the rest of the advertising magnets they come with and throw them away. Usually. At one point I decided that that was a waste of magnets and decided to keep them for some future occasion I was sure would come up. Fortunately it did! I needed to make some gifts to go in that gift basket I made for the baby shower I talked about earlier. I turned them into a matching magnet set. This could be done with any junk advertising magnets that come in phonebooks, mail, etc.

Then you just cut them down to the shape and size you want and glue scrapbooking paper and embellishments on them :)
(I just used a glue stick, nothing fancy.)


Just remember not to make them too heavy, they usually aren't then thickest magnets.

Then, since I was giving them as gifts, I put them in packages that some of my scrapbooking stuff had come in, and I re-covered the labels to match the magnets.
(sorry, I couldn't rotate the image :/-)
Have fun making them your own, and post any additional ideas please, we'd love to hear them!

-K


Sunday, March 11, 2012

Baby Food Jar Re-do (sugar scrubs)


Recently I helped put on a baby shower, and so the next few posts will probably consist of a lot of stuff I made for it. But for the party favors I made sugar hand scrubs (4 different flavors) out of baby food jars--since I have lots and my city doesn't recycle glass. They're pretty easy, and fun to make as EASY gifts :) The scents I used were Lemon, Cinnamon, Vanilla, and Coconut.

Collect however many baby food jars you need (which is super easy if you have a baby eating baby food at the current moment, if not, just ask someone who does. They will have plenty that they probably usually throw out anyway).

Then, after washing them out and taking off the labels, hot glue whatever design you want on the lid.

Spray paint the lids (I only had white, so that's the color I chose).

Then make your labels. I printed them out and then glued them onto strips of scrapbook paper. Then I took clear packing tape and cut it longer than the scrapbook paper strip and then taped it on.

I also printed the ingredients onto Avery Labels (I found a pack of them next to our dumpster one time when a lot of people were moving out and throwing away a lot of stuff, so I saved them). And I stuck them on the inside of the lids.


I also cut pieces of wax paper and put them between the lids and the jars to keep the ingredient label from getting too oily looking.

Then go ahead and mix up your ingredients (recipes at the bottom of post) and funnel the sugar scrubs into the jars.

Then screw on the lids and add any embellishments you want (I use seconds of scrapbook bling that my mom got for free, and that's what you'll see on all my crafts and cards), and now you've got a good looking, useful, cheap gift :) Have fun!

Ingredients:
Extra Virgin Olive Oil, Baby Oil, Organic Coconut Butter, Brown sugar/ White sugar, flavorings, and food coloring.

For portions for one jar:
*Just under 1/2 C. sugar (brown for vanilla and cinnamon/ white for lemon and coconut)
*1/2 C. Oil (Baby Oil for coconut/ Olive Oil for rest))

*1 Tbsp. Organic Coconut Oil (jar has to be melted in boiling water first
*Add flavoring/scent of choice (maybe 1/2 tsp.?)
*And add Yellow food coloring to the lemon and Red for the cinnamon.
The sugar exfoliates and the oils are what makes your skin soft (especially the coconut oil!)

-K

Wednesday, February 29, 2012

LOVE on The Couch

If you're like me, a "collector" of fabric from the remnant basket, then you might have some random sized pieces just asking to be made into a decorative slip cover. I love making slipcovers for my old pillows, it gives them a fresh look, I can change them whenever and it takes little fabric, but adds a punch to my couch. Check out my tutorial on pillow slip covers (last post/ under "index" tab above) for the know how.
Well I have these little pillows that needed a new look. I had some sturdy remnant fabric and Valentine's day was around the corner. That made for some crafting LOVE.
*Print out your letters, mine were as big as they could be per sheet of paper.*Cut out the letter.
*Trace the letter on right side of fabric, I used a fine felt tip pen.
*Paint in the letters, I use regular craft paint. Let dry.
*Sew your slip cover, see slip cover tutorial.
*Slip those babies on and toss them on the couch.
I think this could be great for a monogram as well. Hope you're inspired! Much L*O*V*E! -M

Tuesday, February 28, 2012

Pillow slip cover tutorial

#1 Iron fabric. I am using 2 different fabrics, the fabric for the front has the pattern and back fabric in off white.
#2 Lay pillow on your front fabric, fabric right side down.

#3 Leave a half inch to an inch of fabric around the pillow

#4 Cut fabric.

#5 Now its time to make the overlap for the back. This next step can be done two different ways. Option one is best for your first try: Lay front fabric on the fabric for the back of pillow. Notice the ruler, cut this fabric about 3-4 inches longer on the width then the front fabric. Cut length the same as front fabric. You will end up with 2 rectangles with the back fabric a little longer.

#6 Cut back fabric in half.

#7 Sew a hem on the sides you just cut. Option 2 lets you skip this step by using the salvage edge.

#8 Option two (which is what I did), I like to use the salvage edge as my overlap. Like step 5 you need to leave a few inches on the width, AND on the length, the length edge is the salvage. The salvage side doesn't need to be hemmed. Basically your back fabric is larger than you front fabric. Then cut in half. Rotaite salvage edge until they touch in the middle. It's ready for pining.

#9 Now is a good time to add a cute ribbon to the front fabric.

* I had this ribbon left over from Christmas; it has wire in it which made it easy to fold.

#10 You could do this with non-wire ribbon or fabric, just use your iron and pins to keep its shape. * Sew it on.

#11 Line up the corner of the front fabric and one half of back fabric, right sides together.

#12 Lay down the other half, lining it to the other corner let it overlap in the middle.

#13 Pin the overlap together also pin all around. Sew a 3/4 inch around all the edges. (sew a rectangle) :}

#14 Fun part: turn slip cover right side out and pull over your pillow.

* Front, look'n good.

* Back, nice overlap.

* Next time you could change it up and make the "back" the "front"(overlap is on the front).
*Enjoy your fun new pillow! -M